
Here’s a step-by-step guide to making a simple frame by frame animation in Photoshop, and saving it as either a GIF or a video. This corresponds to an in-class tutorial for COMD 200, and was last updated Fall 2025.
What’s Frame By Frame Animation?
Film, video, and animation all work by showing a series of images that give the illusion of motion or change over time. For example, think about flip book animations, film strips, or how you can pause videos and see one still image. Each still image is called a frame, and the number of frames that play per second is the frame rate.
Frame by frame animation means we’re preparing artwork for each individual frame, rather than using software that automatically generates in-between frames based on changes to 2D or 3D objects.

Another common use of frame by frame animation besides drawings and graphics: stop-motion animation, where you animate a series of photos, and move/change the objects or subjects a little bit between each image. It’s often done with clay, or figurines & models…and sometimes just done for style or special effects in scenes with human actors.
Setting Up A Frame Animation in Photoshop
We’re going to use the series of scissor images above for this example. COMD 200: the folder will be available to download on your class Moodle.
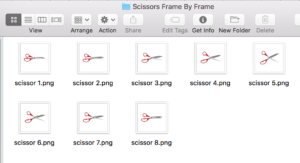 You can even see a rough version of the animation by viewing them in order in the Finder window’s image preview. However, we want to make an animation that’s contained in one file and plays automatically.
New Document
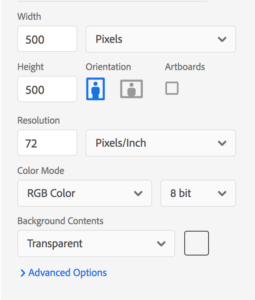 Let’s make a new blank document in Photoshop for this animation. This sample is going to be 500 x 500 pixels to match the size of the scissor images.
This is all based on knowing the GIF will be viewed on a screen: 72ppi is the minimum resolution for screens, RGB is the color mode for screens, and pixels are the most relevant unit for screens. We don’t want to see CMYK or inches/mm here – those are for print.
You might find it easiest to switch to Photoshop’s “Motion” workspace (go to Window > Workspace in the menu.) If not, the windows you’ll need to have open for this are Layers and Timeline.
Bringing In The Images
Now, we’re going to select all the scissor images in that folder, and just drag them into the new Photoshop file. Drag the 8 files onto the canvas, then just keep pressing return (enter) until they’re all placed.
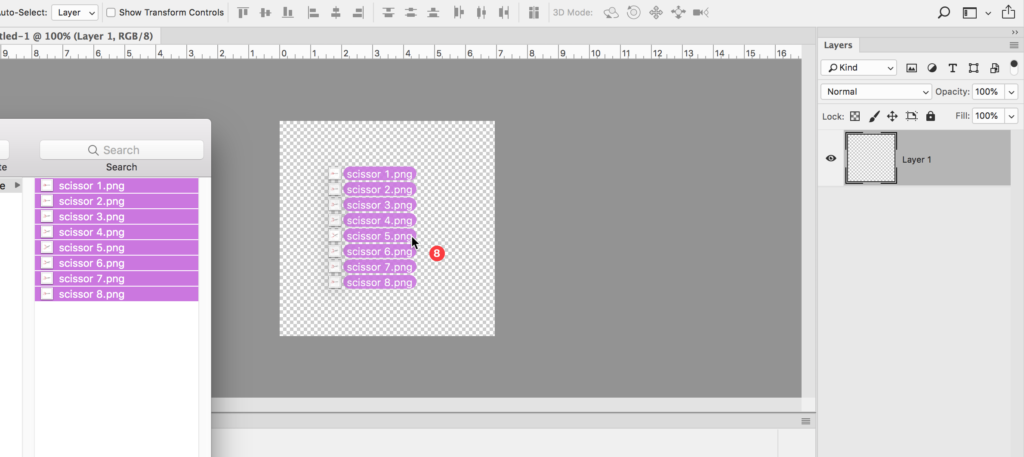
Notice that this places each image in the new document as a layer, and that’s not the same as opening each image file in Photoshop. The layers are smart objects, which means that they can update if you make changes to the original .png files, and the layer artwork can’t be directly edited. If you want to break the link and make a smart object into a regular Photoshop layer, right-click it (control-click on a Mac keyboard) and choose Rasterize, or select the layer and go to Layer > Rasterize > Smart Object in the menu. Smart objects are not necessary for making an animation: this is just a convenient way to bring in a folder full of pre-made images as a stack of layers. The steps to animate these layers would be the same if we had just drawn each of them directly in this Photoshop file.
Create Frames
So far, the Timeline window looks empty, and there’s a dropdown menu in the center with a choice between Create Frame Animation and Create Video Timeline. Click Create Frame Animation. (We’re going to ignore the Photoshop Video Timeline for this tutorial. We’ll do our timeline animations for COMD 200’s next motion project in After Effects instead. AE can do everything the PS timeline can do, but it’s far more powerful and flexible.)

We start with only one frame, and that’s fine. Click the menu at the top right corner of the Timeline window, and choose Make Frames From Layers.
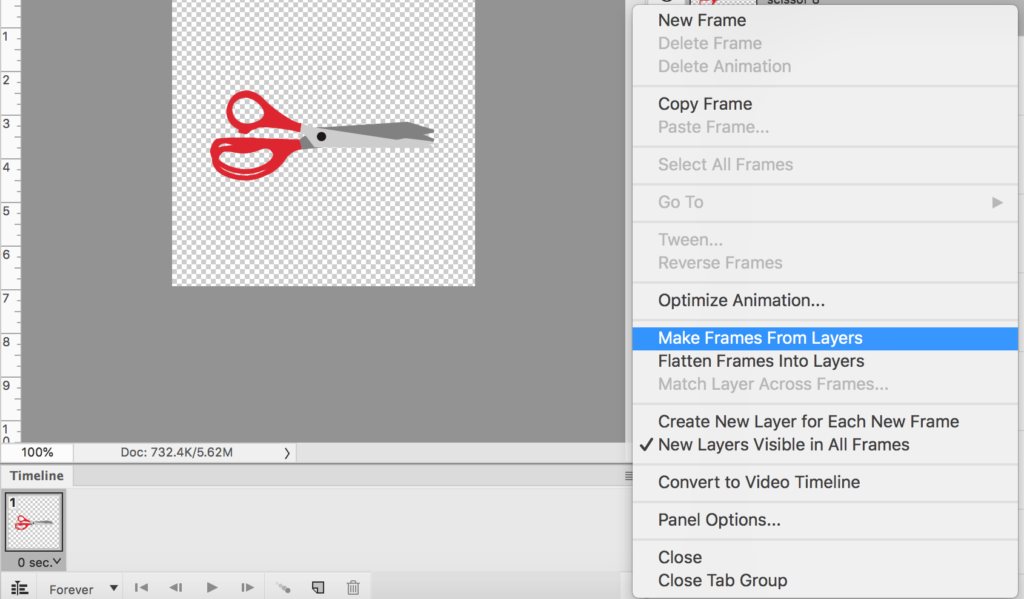
Now, there are 8 frames, one for each layer:

Frames can be selected, dragged to change order, duplicated, or deleted. Watch what happens to Layers when you click on frames to select them: the matching layer turns visible, and all the others turn invisible. It’s possible to change the layer visibility so that more than one layer is visible in a frame (for example: using a background layer that is visible in all frames.) Adding new layers won’t automatically add new frames.
At this point, you can press the space bar or the play button to play the animation. It looks okay, but let’s adjust the timing:

Click on the arrow underneath a frame to change its duration. I’ve selected all the frames together, because I want them all to appear for the same length of time…but you can also adjust these times individually to make certain frames last longer.
Other options in the Timeline window:
- The dropdown that says “Forever” lets you change whether the animation loops endlessly, or only plays a set number of times.
 This icon that looks like a series of circles is “tweening” – it tries to generate more in-between frames based on what’s already there, to make the animation look smoother. However: if you’re designing an animation where it makes a lot of sense to have software generate in-between transitions, you might want to consider using Photoshop’s video timeline, or After Effects, instead of using this frame-by-frame method.
Exporting An Animated File
Now that the animation is set up in the timeline, we can export it as either an animated GIF, or a video file. (Saving the file as a PSD keeps everything intact as a working Photoshop file, but it’s not a self-contained way to play or share the animation.)
Animated GIF
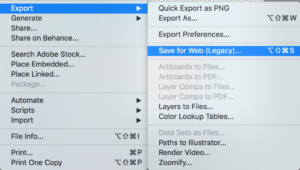 GIFs were designed to be small, efficient image files for web and screen, and they’re suitable for short animations with a flat or limited colour palette.
Go to File > Export > Save for Web (Legacy)… in the menu. The newer “Export As…” options can save still-image GIFs, but not animated ones.

We’ll be looking at the options at the right side of the window:
- First, choose GIF as the file type at the top. The other options here, PNG and JPG, don’t support animation.
- GIFs can have a maximum of 256 colors. The colors are visible in the Color Table grid, and you can set the maximum even lower with the Colors: dropdown near the top. Fewer colors means a smaller file size and a faster loading time. Notice that there’s a check box for transparency, and that transparency counts as 1 color in the table.
- Most of these other options are about how the colors are handled or reduced. Matte changes how the transparent edge is handled – if you view the transparent GIF on top of a background and see a weird outline or ugly edges, try adjusting this setting.
- Image Size can be adjusted here – but, as always, enlarging it bigger than the original size will lose quality.
- There’s also an option here to choose whether or not the GIF will loop forever, and a play button to preview the animation. This preview isn’t always an accurate reference for the speed. It’s better to judge the speed and timing from watching the Photoshop timeline, or a test save of the GIF.
Here’s the final GIF:

Where can you watch an animated GIF file?
- Yes: Any web browser (Chrome, Firefox, Safari, Edge etc.) For a local file on your own computer, it doesn’t matter if you’re connected to the internet.
- Yes: The Mac Finder window file preview and “Quick Look” (spacebar)
- Yes: Working in Photoshop, After Effects, and many other programs that support time-based editing.
- No: The Mac Preview application
- No: In PDF files, or in Acrobat
- Maybe: Websites. This totally depends on whether the site allows/supports them. If it’s your own site / web space, it should work (just include them in the HTML/CSS like any other image)…but for some social media or image sharing sites that don’t allow GIFs, they just won’t work or play.
- Maybe: Mobile devices like phones and tablets. Viewing them online in a mobile web browser should be fine, but whether or not you can use them in apps, or easily save them as animated images, depends on the device and the app.
Exporting a Video File
We can also export a Photoshop animation to a video file. Go to File > Export > Render Video in the menu:
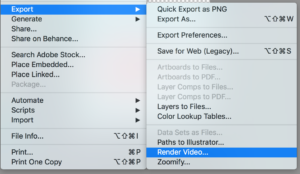
- “Format: H.264” will save a .mp4 file (smaller file size, some compression, standard for web videos)
- “Format: QuickTime”: will save a .mov file (bigger file size, better quality)
- There are options under “Preset” including some specific mobile device screens, and sites like YouTube and Vimeo.
- If you’re not sure about any of these settings, it’s safest to leave them at the defaults.
Unlike GIFs, videos can’t be saved to automatically loop forever. The video file will save with a pixel size, a duration in hours/minutes/seconds, and a frame rate (the number of frames per second)…but looping is controlled in the interface of whatever application, site or device is playing it.