
Preparing artwork for Risograph printing means planning how many inks will be used, and which parts of your artwork will print in each ink. The actual method that will work best for building your files can depend on what kind of artwork it is.
Jump ahead to…
- 1 ink prints
- 2+ ink prints
- Manual + layer separations
- Spot colour separations
- CMYK separations
- Spectrolite app
How The Risograph Works
The Risograph is a stencil process that uses special inks, which can be printed either one or two at a time. Ultimately, what we need to give the Risograph machine is a grayscale page for each ink colour in the artwork. Any method that gets to that result in the end is fine! It can either be a PDF file, or physical pages to scan.
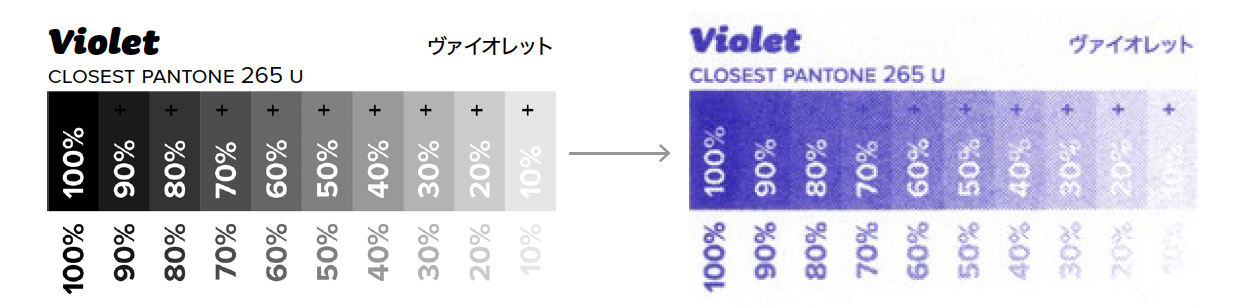
The range of light to dark becomes the density of each ink from 0 to 100%. 100 looks the most like a solid, flat colour, and 0 is just paper with no ink on it. The in-between shades will always have either a dot pattern or a fuzzy texture in the Riso prints, because it’s a stencil process, and the image is burned into stencil paper with tiny holes.
See also: What’s A Risograph? (PDF info poster)
1 Ink Prints
One ink prints are the easiest option: all they need is a black and white version of the artwork for each page. It’s kind of like making photocopies, but you get to choose an ink colour other than black.

You’ll want to pay attention to the range of light and dark, and the contrast.
2 or More Ink Prints
Risograph prints with more than one ink need a separation, to split the artwork into the parts that are supposed to print with each ink. We can either do this manually by layers, or by designating special colours in the file and having the software generate the separated grayscale files, or by using an app called Spectrolite.
Our final print files are one pdf page for each colour.
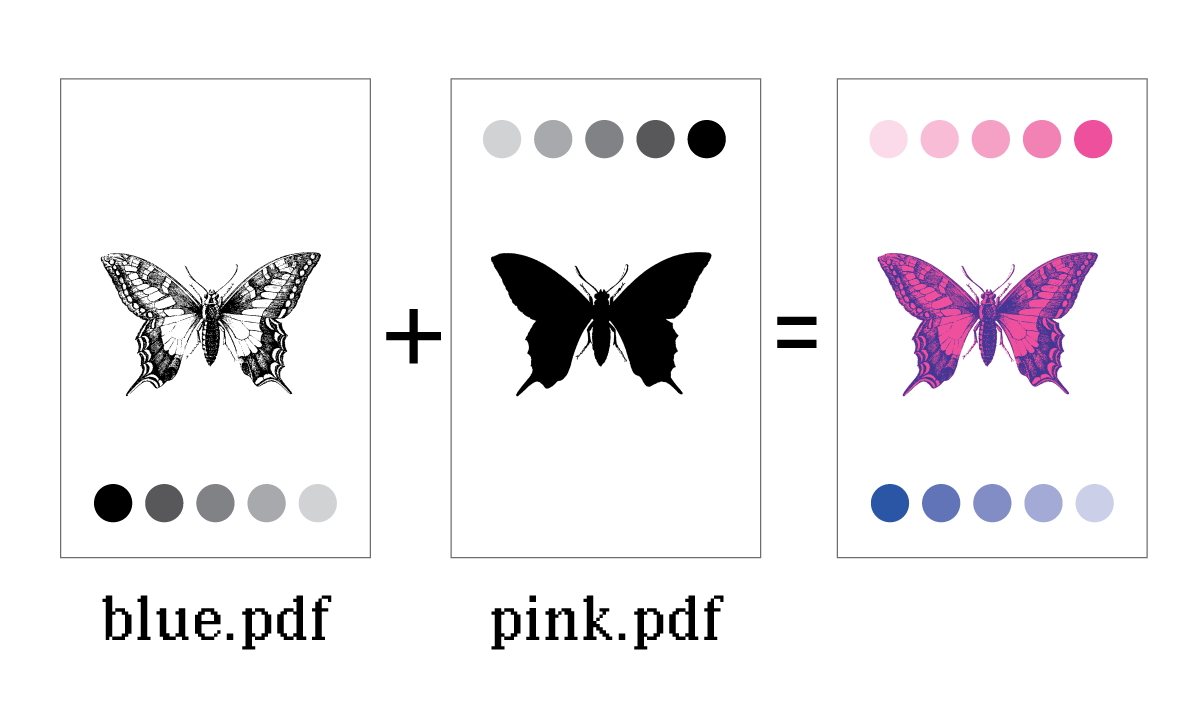
The value range of each file from white to gray to black becomes each ink’s density from 0 to 100%.
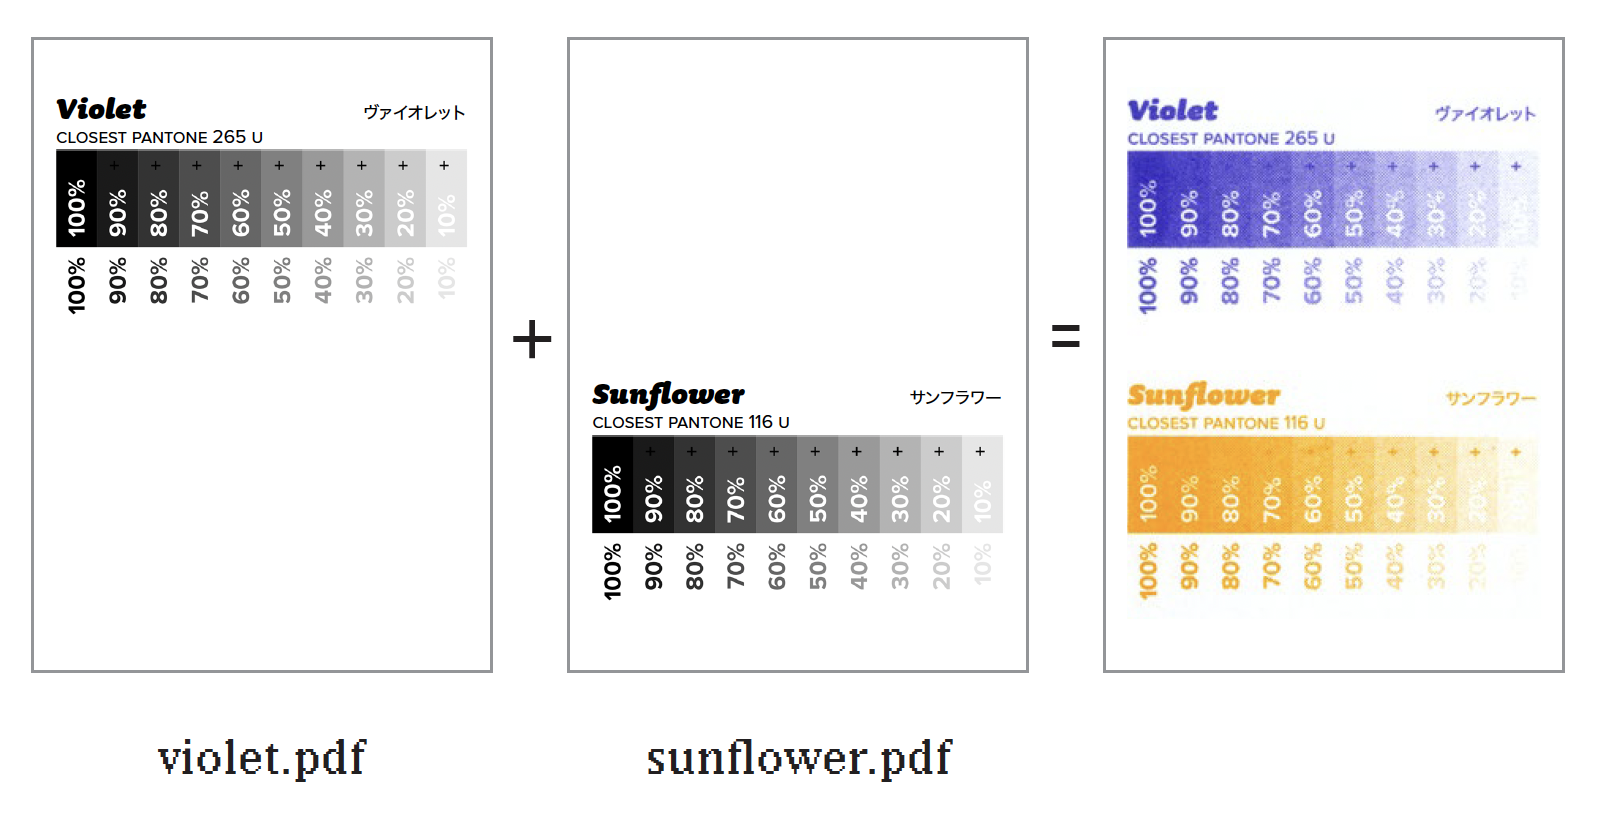
Please note: our Riso can print either one or two inks at a time, so artwork with three or more colours needs to wait a day to dry between each pass.
Manual + Layer Separations
In any art program that has layers, you can prepare your artwork with a layer for each colour:
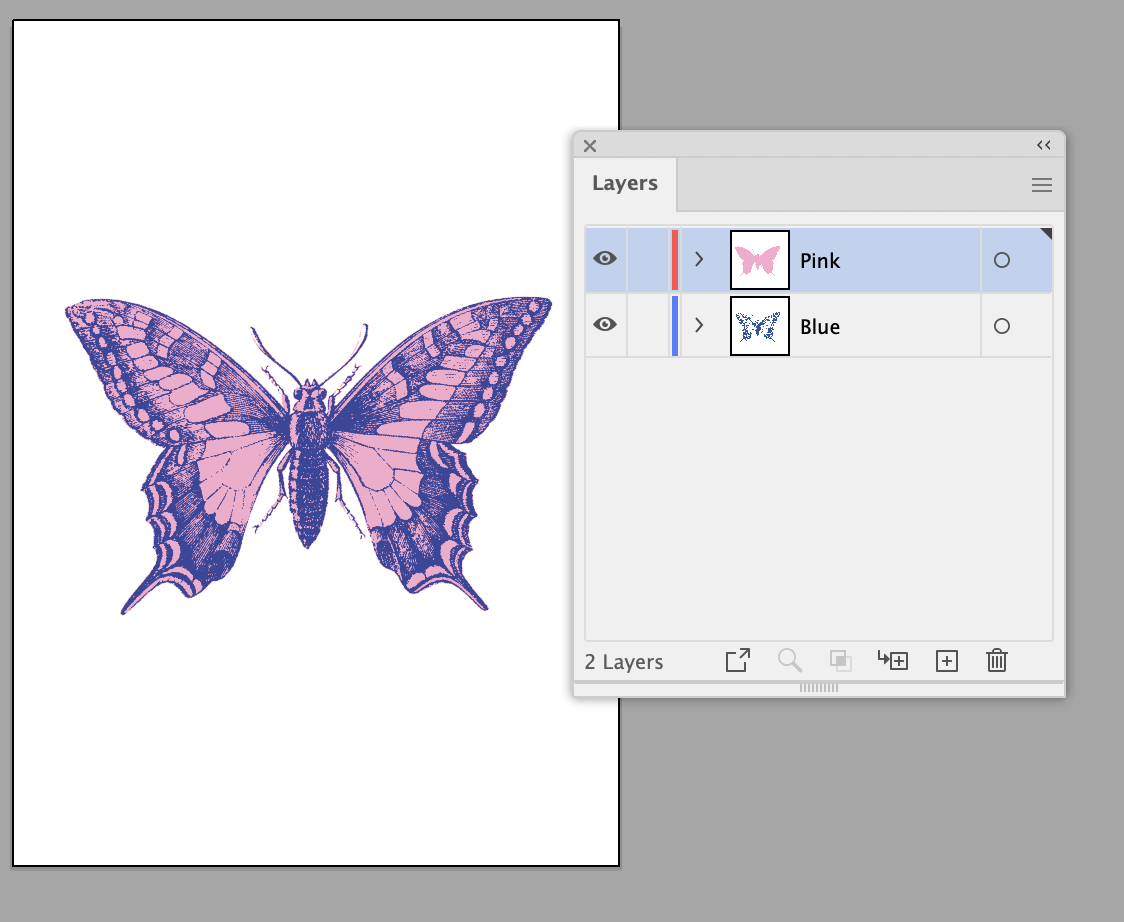
Before we save our print files, these layers need to be changed to black, or shades of gray. Then, we save each colour as a separate PDF. We want only one colour layer visible at a time for saving. We could delete the other colour layer for each of the final print files, but in this sample it’s just hidden.
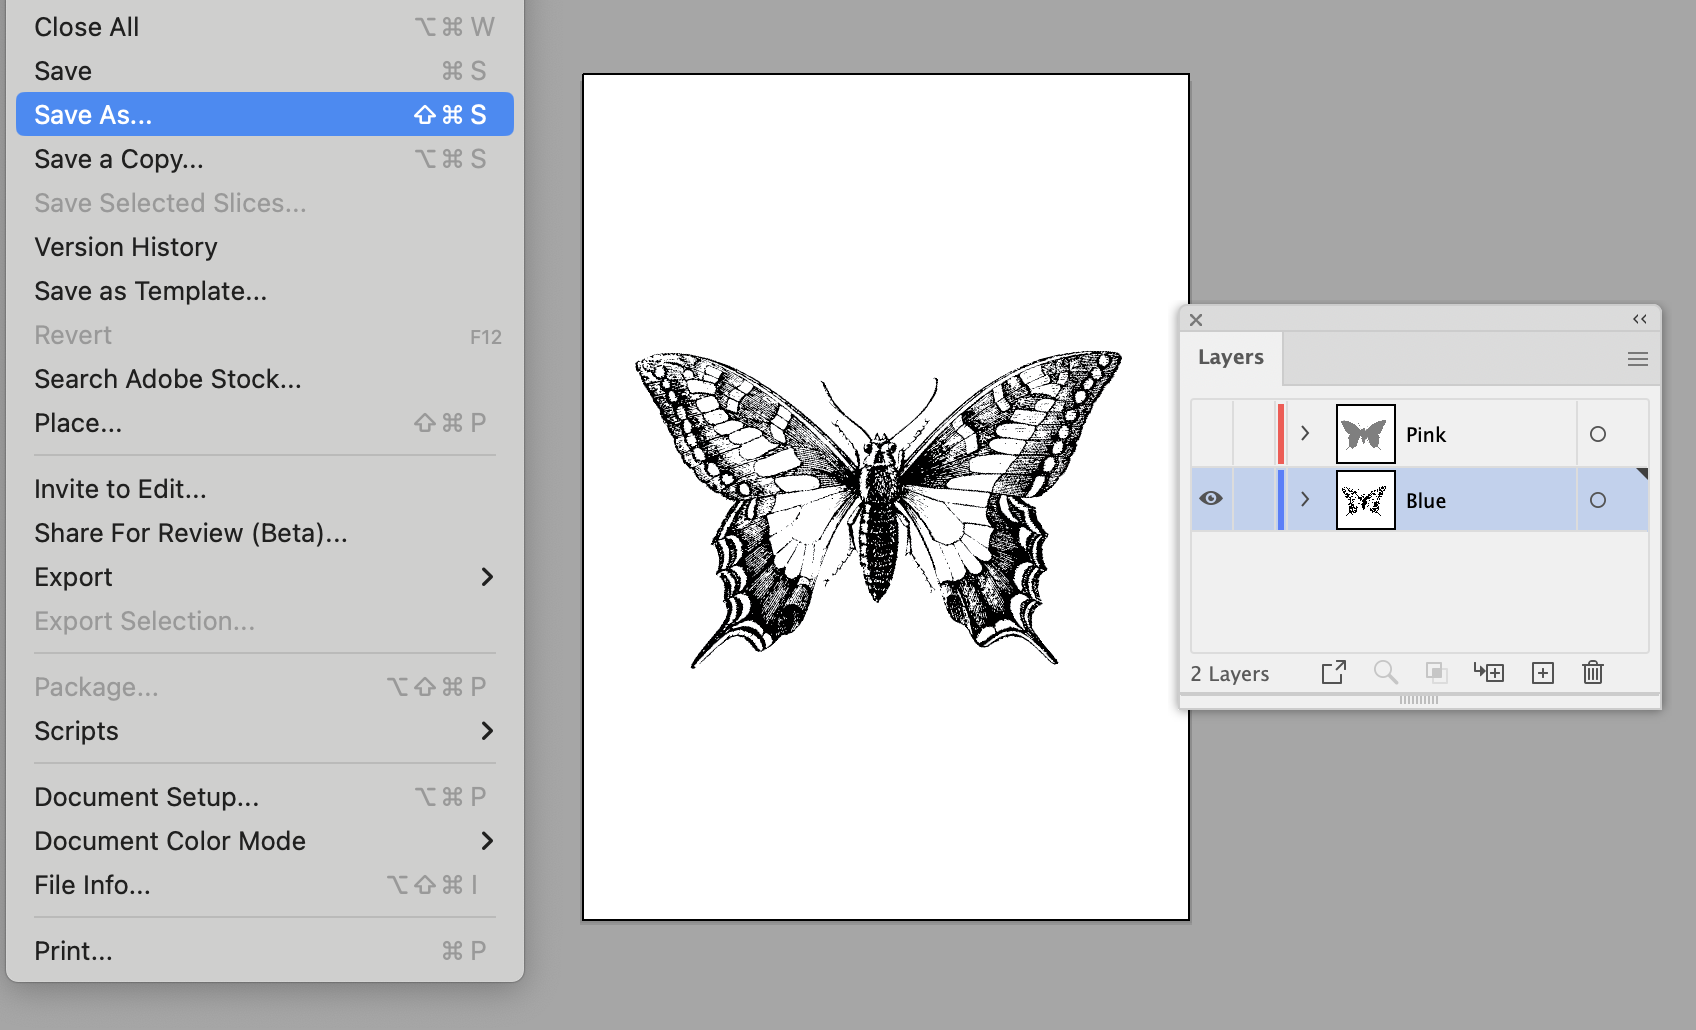
PDFs are a “Save As…” in Illustrator and Photoshop, and an “Export” in InDesign. Other art programs like Procreate or Clip Studio can also save PDFs from your layers.
If you prefer to work analog instead of preparing files on the computer, you’ll just need to think about creating one black and white page for each ink colour, in whatever medium you like (but, to go in the Riso scanner, the pages need to be dry and clean.)
Spot Colour + Ink Colour Separations
We can use special colours in Illustrator, InDesign, Photoshop, or other compatible software to represent the Riso inks and create files where we can easily generate the gray separation pages…but it needs to be set up in a specific way, so that the software understands that each colour represents a different ink.
Ink Colour Separations: Spot Colours
Risograph is a “spot colour” process, which means it uses a designated special ink for each colour instead of the four CMYK inks in a regular full-colour printer. The COMD studio has a set of spot colour templates and swatches that you can download for our Riso colours! We have instructions on that page for how to use the colours in Illustrator, InDesign, or Photoshop.
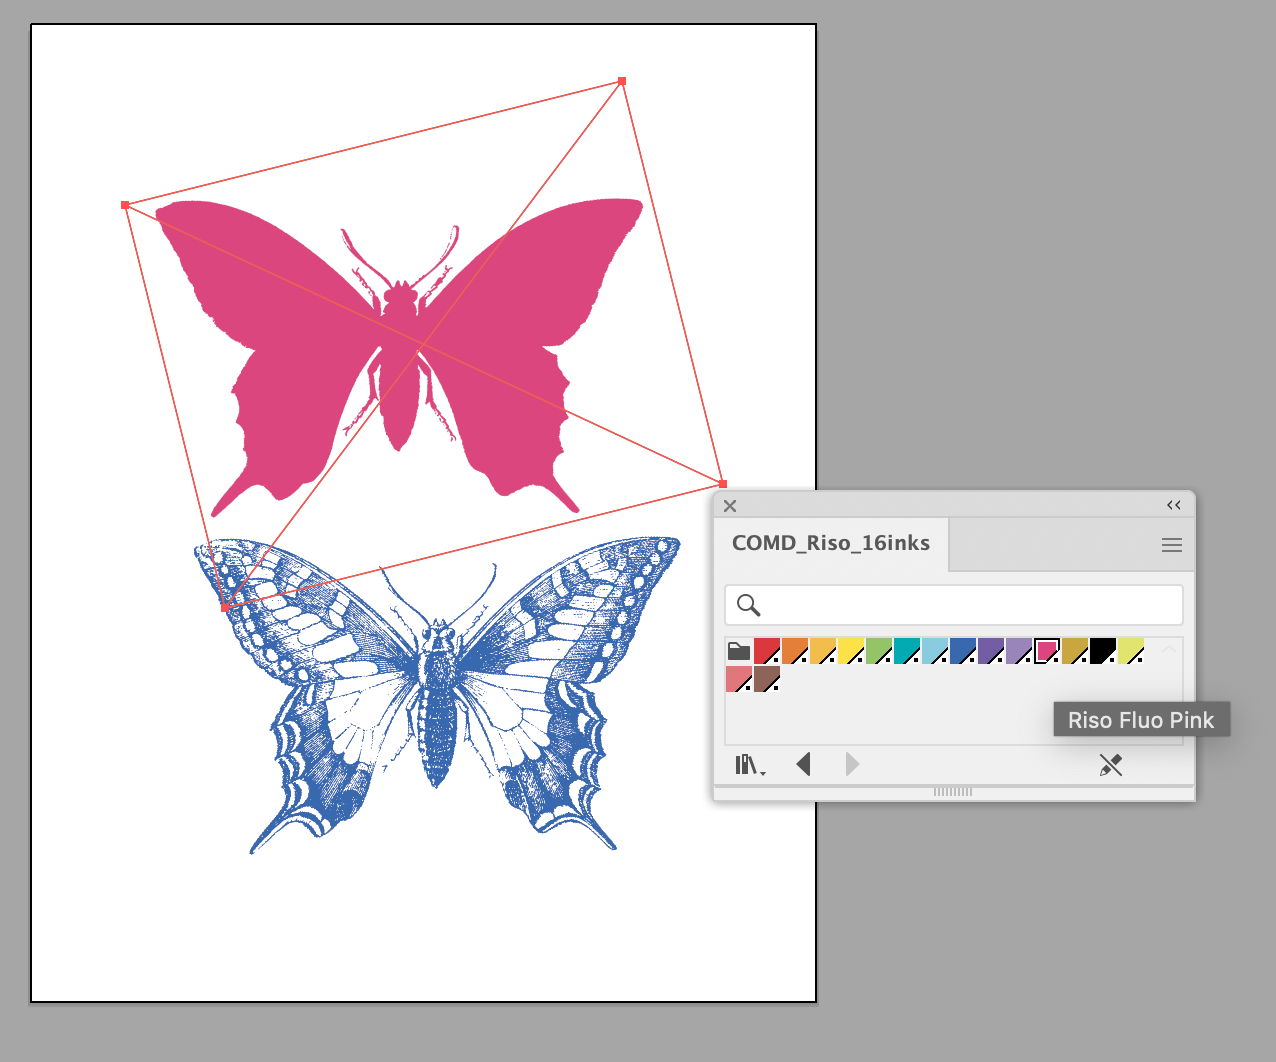
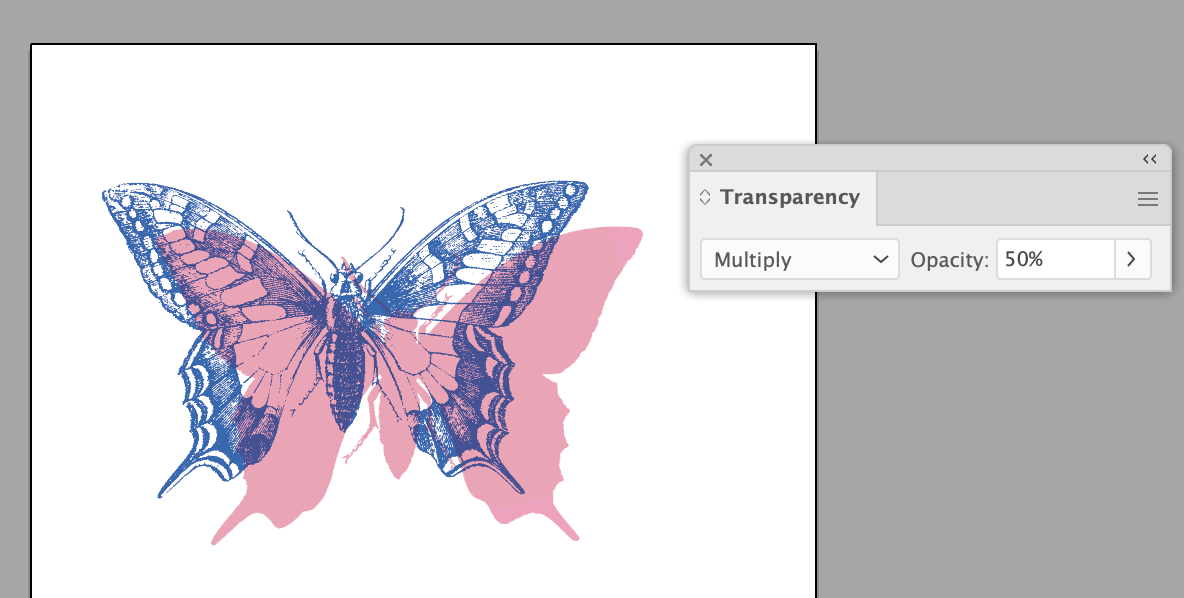
The swatches are usable in Illustrator or InDesign, and can be applied directly to vector shapes and type. Please see this tutorial for instructions about how to apply them to placed pixel/raster images. If your entire working file is in Photoshop, then the spot colours use channels, not swatches, which is a different process.
When you’re ready to generate the gray print files, you can either bring your spot colour file to a tech appointment, or take a look at how to generate your own separations.
Ink Colour Separations: CMYK
You can also use Cyan, Magenta, Yellow and Black in a CMYK file as placeholders for a 1, 2, 3, or 4 colour print. They can work similarly to the spot colours.
Here’s a sample image with the two colours set to Magenta and Cyan swatches in an Illustrator file:
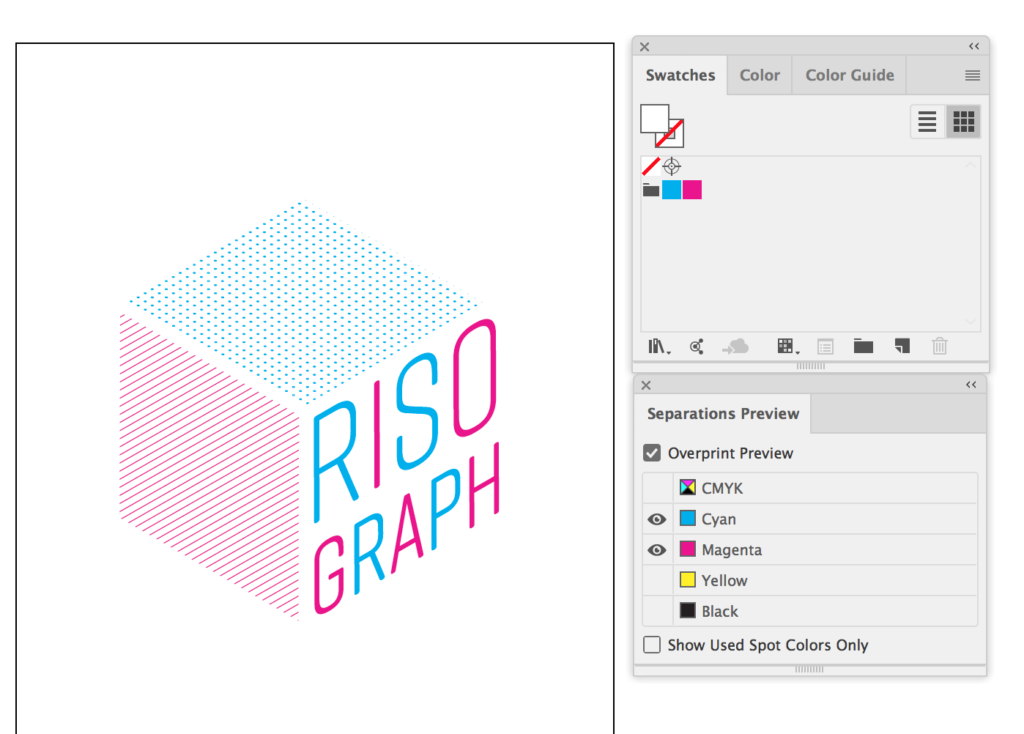
The benefit to this, rather than separating it by layer, is that you don’t need to manually convert all the colours to black and white and save a file for each layer separately.
You can also work with full-colour CMYK photos or artwork, and choose which Riso inks to substitute for each of them. Here’s an example:


If you’re starting with a full colour CMYK image, you don’t always need to use all four separations for your Risograph print. Since our Riso prints two colours at a time, it’s efficient to just choose two of them (for example, cyan and magenta), and substitute whichever two Riso inks you want.
When you’re ready to generate the gray print files, you can either bring your CMYK files to a tech appointment, or take a look at how to generate your own separations.
Generating the Ink Separations
In Illustrator or InDesign:
When you’ve got all the pieces of your design assigned to your Riso ink swatches…
- Go to File > Print (yes, this is under Print, not Save or Export!)
- At the top of the print window, where you’d choose a printer: if you’re using Windows, pick “Adobe PDF”, and if you’re using a Mac, pick “Adobe Postscript File.” This process is a little easier with Windows, so if you have a Mac laptop, you might want to do this part on the Riso computer instead.
- Choose the settings like the size of your paper, and whether you want to include bleed and crop marks.
- Then, go to “Output” in the print window sidebar. Change “Composite” to “Separations (Host-Based)”. You’ll see a list of all the inks in the file. Click the little printer next to each of them to take away any that you’re not using. You only want that printer icon next to the separations that you want.
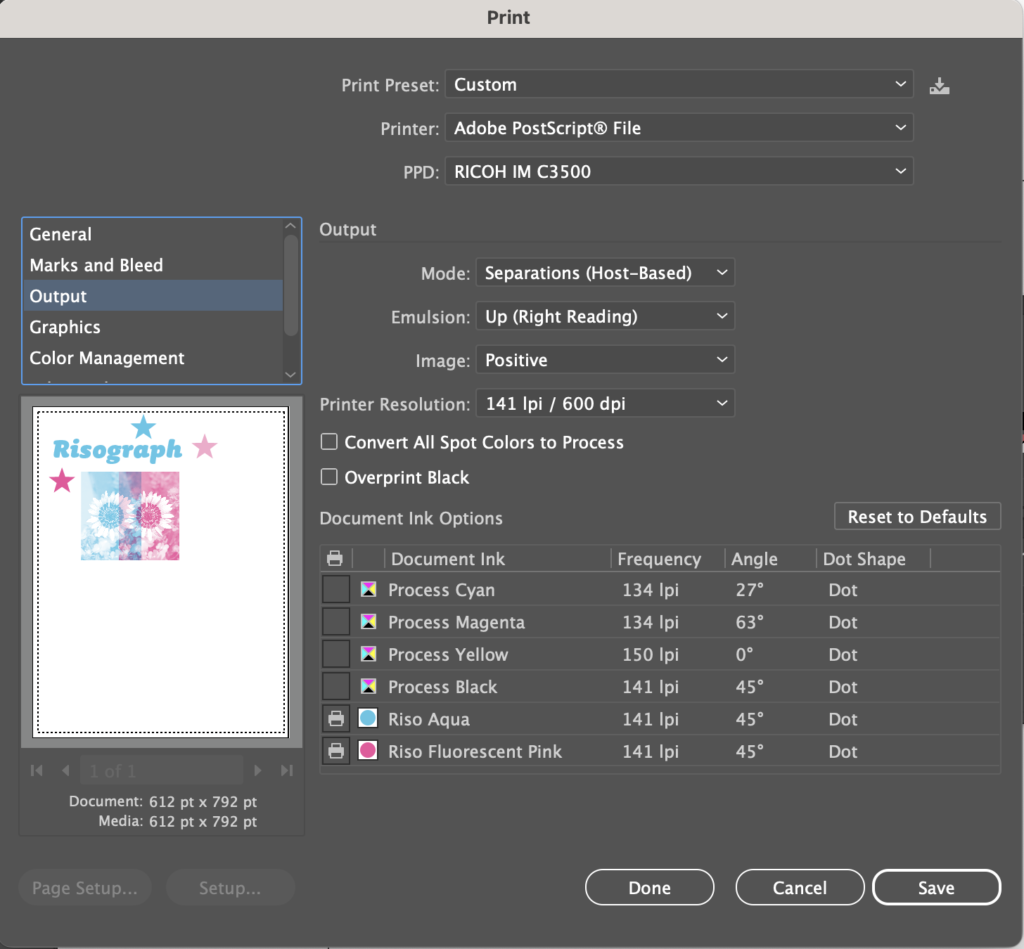
- Now, click either “Save” or “Print” (this depends on your computer and which program it is.) If you’re using Windows: it will save a PDF file with a page for each grayscale separation, and the colour names should be in the page numbers. Easy! If you’re using a Mac: It will save a Postscript .ps file, and you’ll need to convert that to a PDF. The best way to do that is by opening it with a program called Acrobat Distiller. If you have Adobe Creative Cloud and Acrobat installed, it should be on your computer…but if not, and if you don’t want to install it, it’s available to use on the studio computers.
- If any of these settings aren’t available in your Print window (unfortunately, they aren’t on everyone’s computer), you can bring your working .ai or .indd file to a school computer and do the separations there.
- You can also save a PDF from Illustrator or InDesign that includes spot colours, and can be used to generate gray separations later. Just make sure that, when you save or export the PDF, the Colour Conversion setting under Output is set to “No Conversion.” If it’s from InDesign, it also has to be “Adobe PDF (Print)”, not “Adobe PDF (Interactive)”
- If your separated gray PDF pages have ugly thin white lines on them: don’t panic! It sometimes looks like that on screen, but that doesn’t show up in the print.
In Photoshop
When you’ve got the artwork for each ink ready in each channel, go to the side menu in the Channels window, and choose “Split Channels”. It will create and open a grayscale file for each of them. For your print files, for each of them, go to File > Save As, and choose “Photoshop PDF” as the file type.
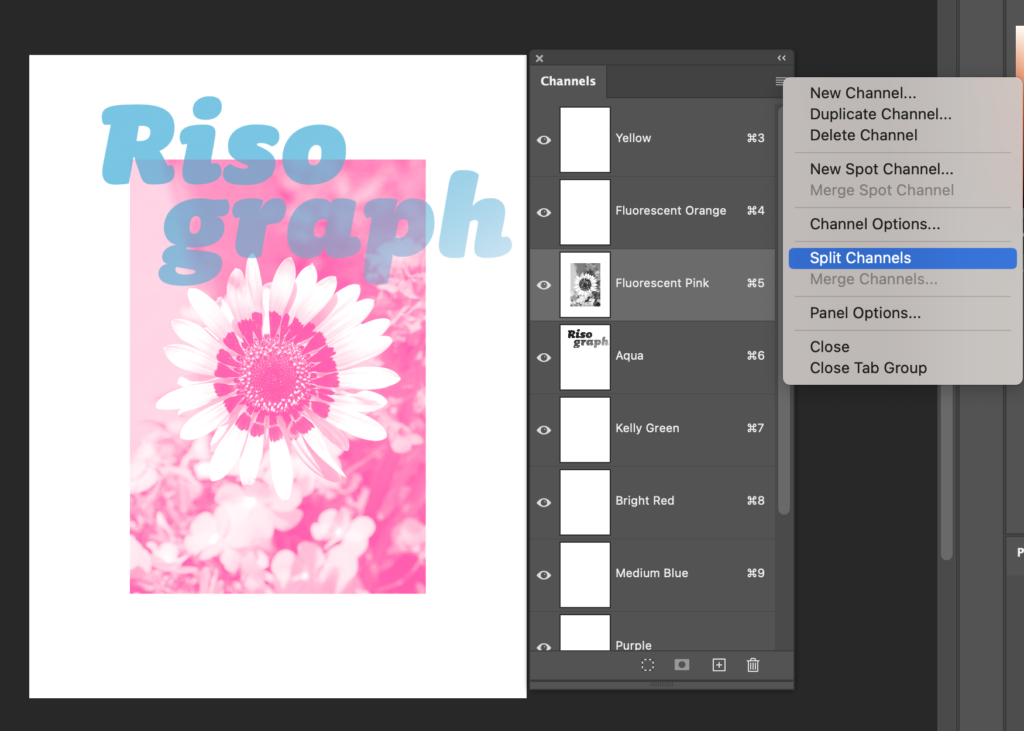
The example above contains blank channels for the colours that aren’t being used…but you can clean things up by deleting unused channels before splitting them (just select them, and click the trash can at the bottom right.)
Spectrolite App
On your own Mac or Windows computer, you can download a free app called Spectrolite to generate Risograph-ready separations from colour files. We also have it installed and available for you to use on all the studio computers in COMD. It’s a popular way to prepare Riso art, and it’s very cool that an independent team built this and released it for free for the Riso printing community.
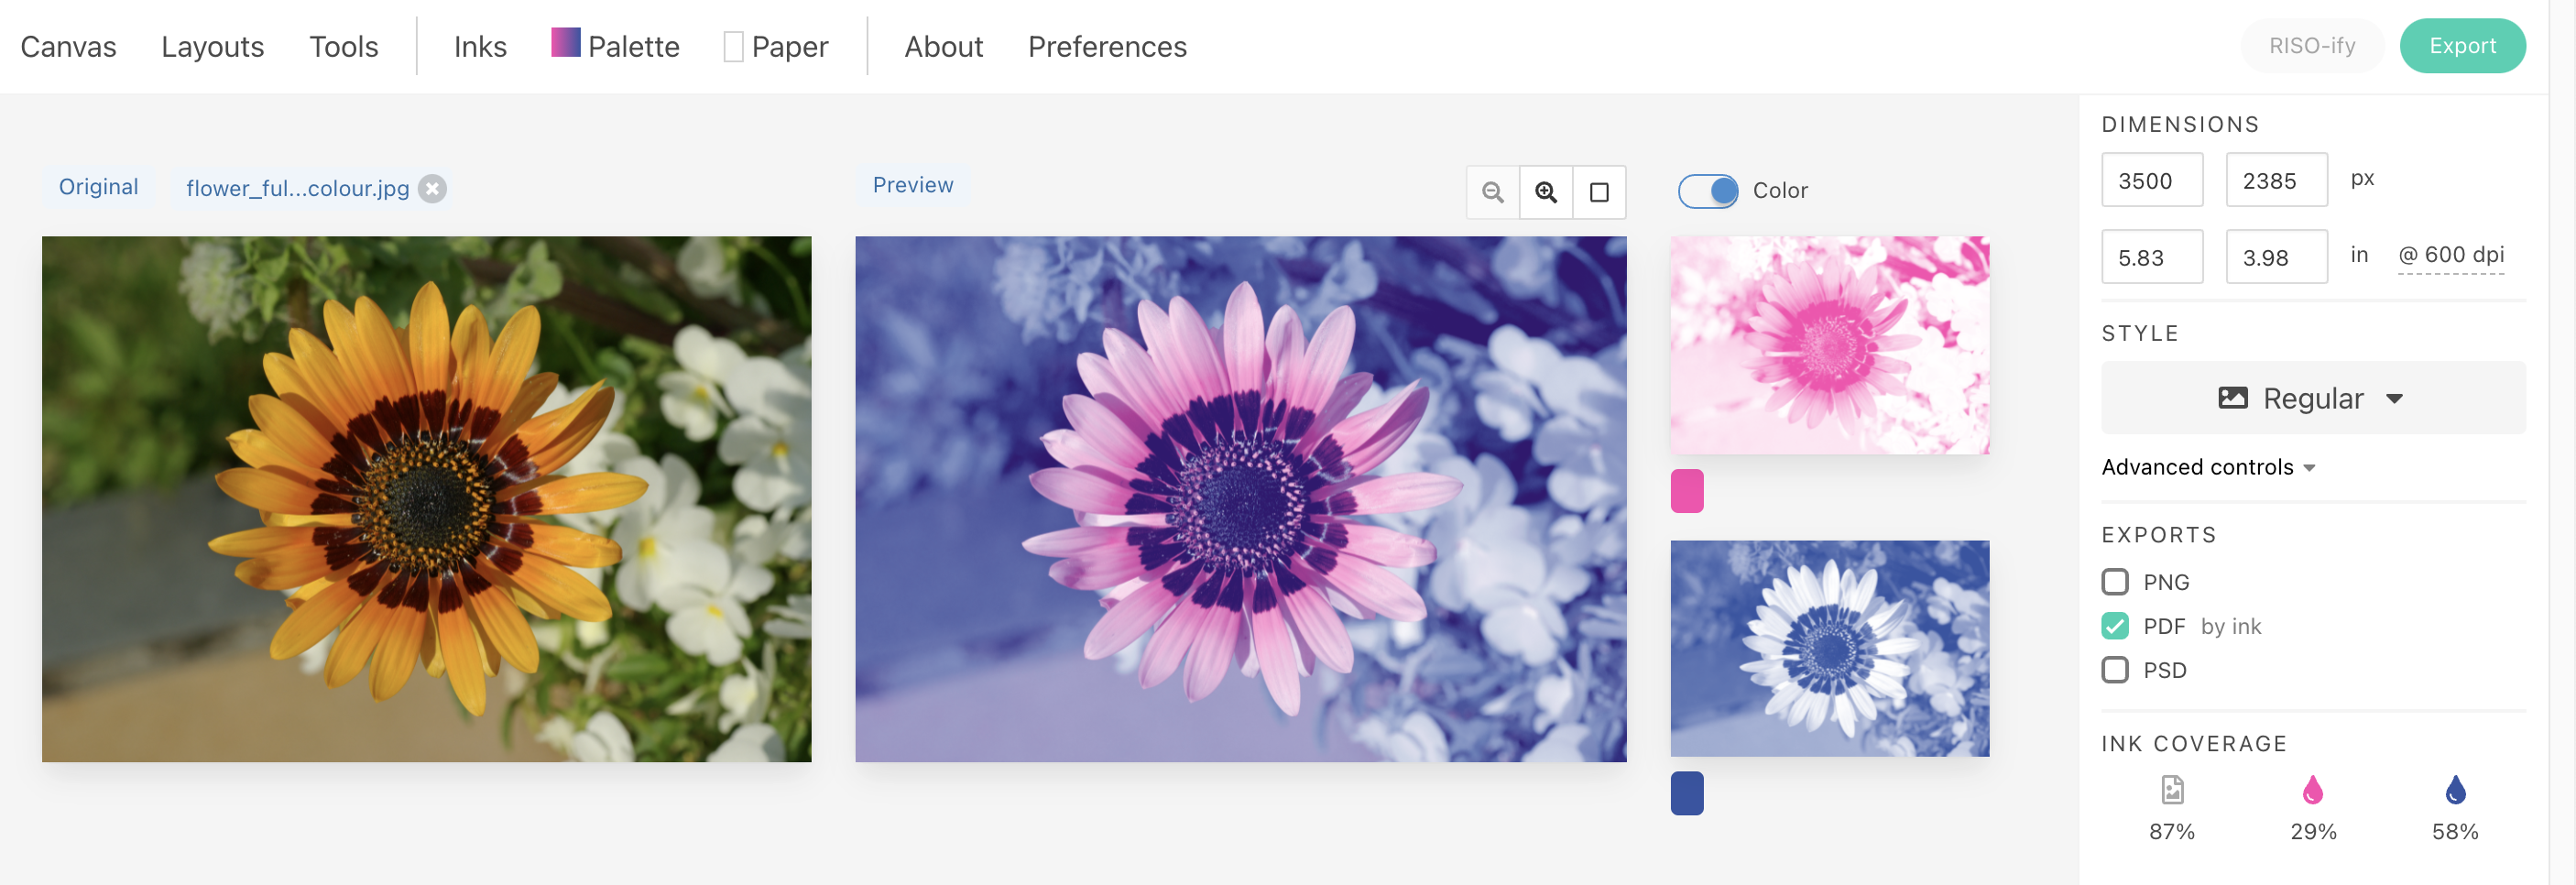
It’s a fun, accessible, and quick method for separating Riso files…but you won’t get the maximum level of control that you’d get from fully building your own separations with methods like spot colours or layers.
Spectrolite works by looking for similar colours, so if you’re having trouble getting a good result, try to make the colours in your original art as close as possible to the ink palette you want to use. One way to do this is to open the image in Photoshop, do Image > Adjustments > Hue/Saturation, and move the Hue slider around until it looks closer to at least one of your intended Riso colours.
Using Spectrolite for the COMD Risographs, you’ll want to make sure you:
- Save PDFs (not PNGs) as your final print files. You should have one black/grayscale PDF page for each ink colour.
- Make sure it’s set to your paper size in inches (8.5×11 or 11×17) at at least 300dpi resolution. If you set it at 600dpi instead of 300, the file be fine with only half the size in inches…but we might need to resize the PDF when printing so it doesn’t come out too small.
- Watch out for heavy ink coverage! If you get a separation with a huge area of 100% black, you’ll need to adjust that before printing. There’s also a setting in Spectrolite under “Advanced Controls” to lower opacity.
- For your palette, make sure to choose only ink colours that we actually have! It will show you lots of other Riso inks that exist in the world, but we can only use the colours that we have in the studio.
- Don’t choose “halftone” in the settings if you want the Riso machine to generate its own halftones from your shades of gray. It’s a choice that just depends on which look you want for your dots: building them right into the file, or letting the Risograph make them.